Welcome to my crazy world!

Hello and welcome!

Sunday, April 29, 2012

Tea Blending 101


Last year I completed a one year Tea Sommelier program at our local culinary college. After a pretty intense year end evaluation which included the blind tasting of 10 different teas, I was certified as an accredited Tea Sommelier by the Tea Association of Canada. However, the teas we studied were pure teas, not flavoured, or blended teas.  So anything like Tutti Fruity vanilla tea, jellybean tea, etc… were not on our syllabus.

Yes, there is actually jellybean flavoured tea, but I hope it doesn't have jellybeans floating in it!


We studied the Camellia Sinensis Sinensis plants and Camellia Sinensis Assamica (Chinese and Indian tea bushes).  We also learned about tea production, from leaf plucking, drying, killing the green via moist  (Japan) or dry heat (China), oxidation (if any), to packaging.  So we studied pure teas, orthodox (whole leaf) to ctc (cut, tear, curl - the product in tea bags).  I'm sure I've gotten things mixed up, as its been about 6 months since graduation, and if you don't use it, you lose it! While it was a very intensive one year program, it didn't cover blending.  I guess it would be like a wine sommelier learning how to make sangria.

Every June, there is the World Tea Expo in Las Vegas, and I was tempted to go with some of my peers, but this year it didn't have a tea blending workshop, which was really one of the classes I was interested in.  Whatever I do with my Tea Sommelier certificate, its something I should know something about.  Even if I open a tea shop, and sell pure teas, I would also sell blended teas (as realistically these are the biggest sellers).  While I may purchase my blends from tea distributers I may choose to start blending my own or at least a custom blend.  So it really is something I wish we had been taught.

Last night The Tea Guild (yes folks, there are things like Tea Guilds - I see you shaking your head) had a special guest speaker, who presented a Tea Blending Seminar.  The guest speaker was the owner of a high end Canadian tea company.  Not only is she a sommelier, she also studied Perfumery in Paris.  She let us make our own custom teas, and gave us some hints and tips to blending your own teas, and I thought I would share them with you!   This is a very basic blending tutorial (as it was only a one hour seminar).  Here are a few hints/tips:

  • Document your amounts and ratios.
    • Use a lab scale, as it needs to measure grams.
  • Use quality tea.
    • Don't need an expensive tea, but use one which you enjoy drinking on its own.
    • Assam is a good tea for blending, because its relatively inexpensive, has good flavour, and good colour.
    • You can use a whole leaf, but CTC is also fine either on its own or with the whole leaf.
  • Use quality flavours.
  • Layering is key.  
    • For complex flavours, you must layer ingredients from most dominant flavour to weakest, just like perfumers.
    • Wait 36 - 48 hours in between each added flavour.
    • Mix (or roll in an air tight food grade container) for many minutes.  Otherwise the flavour oils will clump in one area.
  • Start with tea, add dry ingredients, then add flavours, one at a time with the mixing and 36 hr waiting period in between flavours.
Easy Peasy!  Now start!

Here is the basic Assam Bouquet blend we made:
  • 80% or 40 gm Assam Tea

  • 16% or 8 gm dried Hibiscus.

  • 2% or 1 gm dried Rose Petals.


  • 2% or 1 gm Rose flavour.


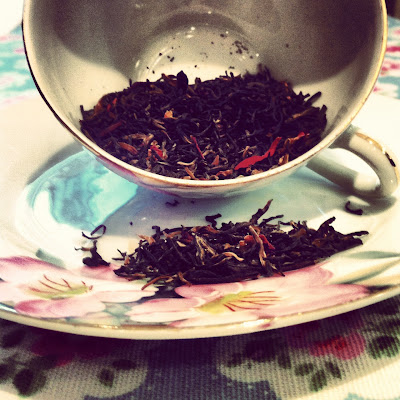
Put the first three ingredients in a stainless steel bowl and mix well.  You can try drinking it like this.  Its quite lovely without the flavour oil.  If you decide it needs a little more kick.  CAREFULLY add a drop of oil and stir/roll/mix well.  Cover and let rest for 36 to 48 hours.  Mix/roll/stir again for about 4 minutes.
This is what you get:


Oh, BTW you need about 2.5 gm of tea for a nice cup of tea, and since its an assam blend, you need freshly boiled water, and let steep for 3 - 5 minutes.  Now taste it…is it too sweet?  Too floral?  Too tart? Add more tea…Play with it until you are happy.  Try adding vanilla flavour (not liquid extract) or a rooibos, just play around until you get it right.  Enjoy!


I am joining up with the following Link Parties:

Keeping it simple:

http://craftskeepmesane.blogspot.ca/2012/04/motivate-me-monday-120.html

Romantic Home:

http://romantichome.blogspot.ca/2012/04/show-and-tell-friday_26.html


Wednesday, April 25, 2012

Vintage Crochet Tablecloth Curtains

Hi there,


Recently I went through my stash of junk and realized that I had substantial amounts of vintage white crocheted tablecloths (actually I also have a stash of beige ones too).  You know the ones.  You see tons of them at thrift shops, usually for a pretty good price.


Yeah, these ones!  I always buy them, thinking that one day I'll make some really cool bohemian looking bedspread or something mindbogglingly creative!  Usually they just sit there in a growing heap.  


Also, do you remember all the fabric rose tutorials around last year?  I made one.


Or two


hundred.  So when I needed curtains for the transom above my front door and the two narrow windows on either side of it (I'm sure there is some technical architectural name for them),  I thought I would use up some of my junk treasured collections/creations!  It was extremely easy. 


For the transom, I just cut measured how long I wanted each panel (allowing room for hemming the top, and some draping allowance).  Then I cut that much from each end of the tablecloth (the width from each side).  This gave me two pieces that were finished on three sides and a long side which was just cut crochet.  


Next I hand stitched (while watching tv) the top into a nice neat hem.  


Then I clipped each panel onto the curtain rods Mr. Husband had screwed in for me.  I used clip rings, but you can easily slide the hem right onto the rod and avoid the extra cost of rings).


Once That was done, I just clipped a rosette into each clip!  Voila!  In the photo below, you can see that the bottom and sides have a nice crocheted border, and the top is the hem.


Forgive the dark photo!  I have a nice camera, but I'm still not used to using it!  My iPhone is just so handy!


Close up.  So easy and cheap!


For the side windows I used crocheted runners and doilies which are usually a buck or two at the Value Village, and hand stitched them together to create the length I needed.  I also added some overlap for interest, and used some beige pieces as well.  Then, you just hand hem the top and bottom with enough room for a rod.


In this photo nicer side faces outside on the side panels.


This was a really inexpensive way of giving my front door vintage character.  It looks gorgeous from outside, especially at night when the interior lights are on.


Cheap and pretty!  And I didn't buy new!  Unless I have oodles of cash to buy from designer sources, I hate buying stuff from big box stores.  No character!  This has character, and it stayed out of a garbage fill.  


Have a great day!


I'm linking to the following blog parties, enjoy all the great eye candy!:


I'm linking to Faded Charms White Wednesday Party!  To follow the link and all the great ideas shown there, just click on the link below:


http://fadedcharmcottage.blogspot.ca/2012/04/white-wednesday-149.html


Sunday, April 22, 2012

Cinnamon Popcorn revisited!


Hi All, a few of my friends have asked me for this recipe recently, cause its something most of our (ahem…) kids really enjoy, and its pretty easy.  So as I posted this two years ago, I thought I would repost cause I'm sure many of you  your kids would love it!  Bon Appetite!


Ok, so last night the 3 kids (all in the same class by the way) spring on me that their having a Valentines party today at school and they signed me up for popcorn.  I've made Mother Goose Popcorn for them in the past but I couldnt find my tried and true recipe (cause I'm sooooooooo organized).  So I searched for it on the internet, and numerous versions popped up.  The first one I tried was absolute rubbish and turned my 8 cups of popped corn into popcorn soup.  NOT NICE.  The next one was this one http://www.recipezaar.com/Mother-Goose-Popcorn-48667 and it seemed easy enough, with simple ingredients.  So I pulled out all my gear/ingredients and lo and behold I had no vanilla left!!  Well, I like vanilla or some kind of flavour just so its not sugar popcorn.  If I'm baking and I dont have vanilla, I usually replace it with cinnamon, so what was another 8 cups of wasted popcorn if it didnt work?  I always experiment, not necessarily successfully, but that doesnt stop me…


Here is a peak at all you need, including that antique air popper (you can get them for next to nothing at Walmart).

Very basic requirements here.  My tweeked version of this recipe is:


  • 1/2 cup milk**I'm Canadian and the what gives it away is our bagged milk!  All my American friends always think this is some kind of urban legend, but its not!  Its real!
  • 2 cups sugar
  • 1/2 tsp of cinnamon
  • 8 cups air popped popcorn
  • red food colouring
Directions: 
  1. Mix milk and sugar in  small saucepan, and heat on medium till it boils.  Let it boil for a few minutes just to give the syrup some body, but dont let it burn.  This must be watched.
  2. Add the cinnamon, and mix well so it disolves into syrup.  You dont want clumps.
  3. Now add as much food colouring as you like.   I made it a bit darker, like cinnamon hearts. Mix in well.
  4. Pour hot syrup over popcorn (in a large bowl) and mix as well as you can.  Try to coat the popcorn evenly.  The syrup will gather at the bottom of the bowl, so scrape it up and keep mixing, almost like 'folding' eggs.
  5. Pour sticky popcorn in two shallow cookie sheets lined with parchment paper.  Place in warm oven.  I usually heat my oven to 200 - 250* F for twenty minutes, then turn it off, and place the popcorn into warm/off oven.  I leave the popcorn in the warm oven overnight. 
  6. In the morning (or whenever you're ready) break up the popcorn and place in airtight container, or just eat it!
Just a warning- Remove any unpopped Kernels prior to coating with syrup or they stick to the popcorn and you dont want anyone to break any teeth.  Enjoy!!


Sorry I didn't take any photos of it once it had dried.  I was too busy/late trying to get it ready for school!  But it looked soooo good!


Linking to:

Funky Junk Interiors Sat Nite Special link party!!


The Cowgirl Roundup link party (use link below)


Having HUGE problem getting the button up, so used the link instead!


Tuesday, April 17, 2012

Checkerboard Painted Floors

Last week while I was blog hopping (my favourite pastime!) I came across a lovely blog with a checkerboard floor tutorial!  This was really close to my heart, as five years ago I would have loved to find a tutorial like that!  Unfortunately, I thought I had saved the blog post but couldn't find it!  If anyone knows what blog it was from, please let me know.


Anyways, this lovely post gave a pretty awesome tutorial on painting checker board floors.  As I said, I did it five years ago and it was totally worth it.  We live in a 155 year old house with original wide heart of pine floors.  Not such a good photo and colour off, but use your lively imagination...


We had just built an addition and couldn't afford to put in reclaimed pine.  My contractor didn't recommend new wide pine, because he said when it finally dried, the wider planks tend to warp more (a new floor today was a tree last week - sad).  Anyway we had to use 3 1/2 " width.  I wasn't thrilled because we worked so hard to have the kitchen addition look like it was an original part of the house, to then have these skimpy wood floors bugged me!  Also the pine is so white when its new and it has lots of knots.  The contractor guaranteed me that within 3 years the colour would match my existing floor.  He was right!

New floor after 5 years


The old floor runs straight into the new floor, so I was on a mission to do something to distract the eye from the change in flooring.  Whenever I perused a book or magazine and saw checkered wood floors I always loved it, and I thought 'Hey, I can do that!'.  I also thought 'Hey, I can afford that!'  It would only cost the paint, tape, and mineral spirits.  The contractor was going to varnish it anyway, so that wasn't an extra cost.  Although when I told him I  was going to paint my newly laid pine floors, he and my husband started plotting to have me institutionalized!  I was nervous about touching the floors, but it was so worth it and they were SOOOOOO WRONG!!!!!


In total, it took 3 days of scratching my big head while plotting out my pattern on graph paper (use pencil, have a BIG eraser with you…unless you are a math whiz).  It also took about 3 days of plotting my pattern on my new, unvarnished, unsealed pine floors with my big T square tool, chalk, and masking tape, then applying the paint.  It is TOUGH ON YOUR BACK!  Hint, wine helps with this.   I did use MASKING tape not PAINTERS tape.  I had started painting my checkerboard pattern with painters tape, but it was mildly bleeding in some spots.  Although I had taped it nice and tight and pressed firmly and used a very dry rag dipped in minimal paint mix near the tape, it still bled in spots!  Yuck!!!!  My wall painter suggested the masking tape.  As he pointed out, my floors had no existing finish or paint on it to damage.  Why not!  BRILLIANT!!!!  It was magical!  Clean crisp lines!

Also, I wanted my floors to look like a stained checkerboard floor, not a painted checkerboard.  When I researched the stained option, any book, website, etc… I found said I had to score my floor with an exact knife in the checkerboard pattern after taping, but before staining.  This is to stop the stain from seeping under the paint (through the wood) and causing a bleeding disaster.  Stain is absorbed into the wood, unlike paint which just sits on the surface.  The cut is to separate the wood to give the stain a boundary.  Does that make sense?  WAY TO MUCH WORK!  Plus, I don't trust myself with an exacto knife!  Sometimes, if I don't keep my exacto knife pressed firmly only ruler, with wavers, and I get a wavy cut not a straight one!  I just didn't want to risk ruining my newly laid floors being totally cut up!  I know my limitations, and straight lines is one of them!


I read that you could get a mock stained look by mixing oil paint (durability) with mineral spirits!  This will make the paint mixture translucent.  You decide how much mineral spirit to use, by the colour you hope to achieve.  I think I used 1 part paint to 1/4 part mineral spirits.  Remember, try it and ad more, but remember to remember how much you added!  If you need to mix up more paint, you want the same colour density.  Use a relatively dry rag for the painting/staining.  If you want more colour intensity, go over it again, but this way you can control bleeding and colour.

Once it was done, my contractor asked me if I would do it for his other customers…Ahhhh….NO!  I have a bad back to begin with, and while I would sacrifice it for MY floors, I couldn't do it more often.  
Whenever anyone comes in to our kitchen, especially the men, they LOVE it!  My husband brags about it!   So MR CONTRACTOR AND MR HUSBAND had to EAT CROW!!!!


After I had painted the checkerboard, I painted the border around it, and it contained the room, like a nice carpet.  


Have a great day!


Also Linking up to one of my favourite blogs…My Romantic Home.  Link up Here:
Show and Tell Friday at My Romantic Home


Tuesday, April 10, 2012

Why can't I finish one project before I start another?

I hadn't  even finished my living rooms last corner, before I started the master bedroom!  Well, to be honest, while I'm dying to finish the last corner, that would require emptying and moving the BEAST of an armoire in that corner!!!!

Behold the Beast:


Until I work up the courage  strength to move this armoire, I'm tackling other smaller projects, like painting and redecorating my bedroom!!!

The 'Before' colour was a colour I loved on the paint chip (why does that always always happen!), but wasn't so crazy about it on my walls.  It was pleasant enough, it just didn't 'work' with the look I wanted.  Instead of a serene, cohesive look, the aqua colour just looked 'off'.

Here are some 'Before' pics:


I wanted to paint it nice white, but a bit more greyish white than pure white.  I didn't get any photos of the empty room with the 'After' colour, just a couple of photos after I shifted things back into place.

Here is an 'After' in the little corner near my bed:


I painted the flying pig painting a few years ago, and while Ioved it, it never fit into my home, as the colours didn't go with the more sherbet tones I had my walls painted.  Doesn't it look better with the new colours?  I love it now!  I call this 'Ham Highway'.  


Here is another corner.  The new wall colour looks much more suited to my furniture.


I still have to figure out what to hang over this tallboy.  It looks kind of empty above it.  Maybe a nice old mirror.  Did I ever mention I have about 5 nice old mirrors in my basement just waiting for a wall?  I'm sick sick sick I tell you!  Why do I buy so much old ****!!!!  Because I love it?  See, I'm talking to myself now…


She looks so lonely alone on that wall…She needs a mirror!


Here is my vanity, with a nice assortment of lovely old china!  Unfortunately I had a casualty when rehanging them.  I lost one of my favourite ones…  So sad : (


Okay, so the vanity top requires a little tidy up! 


I can't help using some of the vintage-y filters!  They make everything look so much sweeter, don't they?


Doctor Who seemed to make his way into my bedroom again!!!  I can't seem to hide my love for The Doctor, but my husbands not jealous, so its okay.


My vintage handbag/evening bag collection…another sickness…


Okay, enough of my junk, but I'll end it with a sweet little photo of a really old, lace childs dress.  It got a little more 'holly' after I hand washed it, but in DESPERATELY needed washing, but for $5 including the sweet hanger, I felt it was worth it:


You can't really see the hanger from this photo, but its an old wood hanger, painted green with white roses and dots hand painted on it.  It has such a lovely old patina.  It just makes me smile!

Have a great day!


Thursday, April 5, 2012

Going White


THE WHITE DILEMMA


I have a problem.  I'm usually ahead of my time when it comes to trends.  While I do follow those really irresistible  trends, I try really hard to fight trends.  My usual M.O.  lots is to find things I love, and start decorating/collecting/wearing them.  A couple of years later, my sister, daughter, friends will say 'wow' I wish I listened to you back then.  I used to be a fashion buyer for years, so my eye had been trained on picking interesting new options.

I've fought the WHITE trend.  So as I've watched the 'white/pastel' trend budding, blooming and now beginning to wilt in the United States.  I liked it, but didn't bite.  I resisted, but not only to fight the trend, there have been a couple of reasons I haven't jumped on that band wagon.

REASONS WHY I DIDNT GO WHITE:

Reason 1:  I love Cath Kidston too much!

My kitchen is lovely pale green…


Can you see how light a green it is?  Its just enough to be green (greener in reality), not just a green-y white.  Gives enough colour to  make all my Cath Kidston 'pop'.  I just love Cath!  Have for years, and that is the problem…

While white will also make colours pop, unless I went with the more pastel hues, the Cath colours are often too vibrant.  Hence the light green.  Just enough colour to make it really shine.


More Cath on my curtains, table cloth…


And lots and lots of Cath in the cupboards, which I rotate, as not all the prints work well together.  I guess I'm attracted to the larger florals, which due to scale and colour similarities but not cohesion, don't really work.  I'm just not too into her dots (I do have some, and use them to break up the florals) or her checks (can't waste valuable Cath money on checks!).

Anyway, do to my Cath K collection, I have avoided going all white.

Reason 2:  I grew up with 'builders beige'.  Well, growing up in the 70's it was 'builders White'  kind of off white, creamy, non descript white.

So, I like subtle colours.  My halls are the beautiful Farrow and Ball colour, 'Pale Powder'.  Its magical.  It works with so many different styles of furniture, gold and silver tones.  Its a pretty silvery blue green.


Reason 3:   Three kids under 12.  Colour hides dirt a bit more. 

Exhibit 1:   The Dirt Squad:  They can spill, smudge, smear and destroy any area in 60 seconds flat!  They don't even need capes!


Now my kids are older.  A little less messy.  A little…

Anyway, I've been influenced by all this WHITE on blogland.  I kind of love it now.  So I decided to try a room.  My living room was kinda white.  It looked like a nice parchment colour on the colour chip, but as soon as it was on my walls, it looked…'blah'.  I hate blah!  So last week I bought two gallons of white paint (but, as I found out it wasn't white enough) and attacked 3/4 of the room.  I had to do one wall at a time and shove everything off the wall, fill holes, paint, paint some more, dry, shove furniture back.  I have one corner left to do.

Here is a 'before' colour:


See that wishy washy, not white, not beige colour?  Hmmm… pretty boring.

Here is a new corner….ready for the new colour?  Here it comes…the crazy white….


Nice?  Just wait till I get the rest of the junk in there!  Here's a 'filtered' photo of my 'Crazy lady lives here' corner:


I can hardly wait to finish the room and move all my stuff back in.  Perhaps in a more orderly, organized fashion than the last time…Wish me luck!